Building Offline-First React Native Apps with React Query and TypeScript
Offline-first React Native apps offer a responsive and seamless user experience even without internet connectivity. Using an example app, we’re going to share how you can boost their performance and reliability by leveraging React Query and TypeScript during development.

Offline-first apps like Telegram, Spotify, or Google Maps, enable users to perform core functions even when their internet connection is lost. As a developer, you may be curious about the best approach to develop these types of apps to ensure a smooth user experience and continued functionality.
There's generally little updated material on offline-first apps (with React Query even less so). After all, it's not just about optimistically updating your UI based on user interactions when offline but also queueing all user actions to synchronize them to your backend service later.
Not to worry, because that's exactly what we'll cover here! You'll learn how to easily add offline-first support to your own React Native apps by using React Query and TypeScript to provide a better user experience to your end users. Plus point: React Query will manage all of that complicated sync-to-backend work for you!
Just a quick heads up - this is a more intermediate/advanced topic, so it’s important that you are familiar with React Query and TypeScript.
In this article, we cover:
Offline-First App Use Cases
At Whitespectre, we've applied the offline-first approach to some client partner apps, enabling them to have some core functionality working, even when the user doesn't have an internet connection.
For example, on a Discount and Offers app, we implemented offline-first in the section where users can view their previously activated offers. That way, when they go shopping and don’t have an internet connection, they can still see the list of the products they should buy.
There are many other use cases where having this approach can be beneficial. Streaming apps like Spotify allow the user to listen to downloaded music even when there is no internet connection available. And apps like Gmail, enable the user to write and save emails offline, which will be sent when the device reconnects to the Internet.
However, keep in mind that adding offline-first features may not be suitable for all types of apps. For example, on apps where having a constant internet connection is necessary like a banking or a betting app.
Additionally, while implementing this approach can offer many benefits, it can also come with some challenges, like ensuring data consistency between server and client and resolving conflicts (when the same data is edited offline and online at the same time). So it’s essential to carefully consider if your application should have an offline approach or not.
Tools to Consider for Building Offline-First Apps
When we talk about building offline-first applications, there are some tools you can use to help you to implement them. Let’s explore some of them now with their pros and cons:
Cloud Firestore
Cloud Firestore is a NoSQL document database provided by Google designed to store, sync, and query data, offering built-in features such as offline data persistence and real-time data synchronization.
Pros:
- Easy to implement: Comprehensive documentation and a well-supported client library make it easy to get started.
- Automatic data synchronization: Offline changes are automatically synchronized with the server.
Cons:
- Cost and scalability: Firestore can become expensive beyond the free tier.
- Hard to migrate: Firestore is tightly coupled with the Firebase ecosystem, so it can be challenging to migrate to other data storage alternatives in the future.
Redux Offline
Redux Offline is a persistent store for building offline-first applications with first-class support for optimistic UI powered by Redux.
Pros:
- Extension of Redux: Redux Offline is an extension of Redux, making it easy to integrate into existing Redux-based applications.
- Support for optimistic UI: Even offline, users can see their actions immediately on the UI. It also provides a way to make rollbacks if needed.
Cons:
- Complexity: Redux can add unnecessary complexity to your codebase (depending on the app context)
- Coupled with Redux: Redux Offline is tightly coupled with Redux, which may not be suitable for apps using alternative state management approaches.
React Query
React Query (also known as Tanstack Query) is a flexible and powerful library offering state management and data fetching features in React Native (and React) applications.
Pros:
- Powerful API: React Query provides a set of tools for state management and data manipulation, including features like fetching, caching, updating, rolling back, and syncing data.
- Flexibility: React Query can be used with any state manager approach, giving developers more flexibility.
Cons:
- Learning curve: It takes time to get up to speed when getting started with React Query.
Example Time: Let’s Code a Fitness App!
Our example project will be a fitness app where the user receives the exercises of the day through an API, being able to mark that exercise as completed or not.
But if there is no connection, it stores the exercises state locally, and after the contact, it synchronizes with the backend through a queue of requests.
We will use React Query for its flexibility and powerful API, as well as TypeScript, which helps us achieve type safety and code reliability throughout the project.
To check the full example, check the repository link at the end of this article.
Getting Started
In this example, this is the TypeScript interface we will use to represent each exercise our API will return to the app:
export interface IExercise {
  id: string;
  title: string;
  isDone: boolean;
  isNotSynced?: boolean;
}
Obs: isNotSynced - is a local used property only, it tells us if the current state of the exercise is synced with the backend.
Fetching Data from the Backend
Now we need to fetch the data with useQuery hook, like this:
  const {data} = useQuery({
    queryKey: ['exercises'],
    queryFn: () => api.getTodos(),
    staleTime: Infinity,
    cacheTime: Infinity
  });
Obs: staleTime and cacheTime as Infinity, ensures that once the data is fetched and cached, it remains available for the lifetime of the application, regardless of network connectivity.
After that, we can show the result by mapping the items to a component called <Exercise/> .
Updating the Exercise Status
Let's suppose that the user wants to update the status of an exercise. For example, from 'not done' to 'done'. To achieve this, we will take advantage of the useMutation hook to update the exercise status on both the server and client sides.
Let's update it on server side like this first:
const queryClient = useQueryClient();

const updateExercise = useMutation({
	mutationKey: ['exercises'],
    mutationFn: async (payload: UpdateExercisePayload) =>
      api.updateExerciseStatus(payload.id, payload.isDone),
});
Now, to update the state on the local state, we can use onMutation and onSuccess callbacks like this:
const queryClient = useQueryClient();

const updateLocalExerciseList = (
    id: string,
    isDone: boolean,
    isNotSynced?: boolean,
  ) => {
    queryClient.setQueryData<IExercise[]>(['exercises'], exercisesList => {
      return exercisesList?.map(exercise => {
        if (exercise.id === id) {
          return {...exercise, isDone, isNotSynced};
        }
        return exercise;
      });
    });
  };

const updateExercise = useMutation({
    mutationKey: ['exercises'],
    mutationFn: async (payload: UpdateExercisePayload) =>
      api.updateExerciseStatus(payload.id, payload.isDone),
    onMutate: async (payload: UpdateExercisePayload) => {
      await queryClient.cancelQueries(['exercises']);
      updateLocalExerciseList(payload.id, payload.isDone, true);
    },
    onSuccess(data) {
      updateLocalExerciseList(data.id, data.isDone, false);
    },
  });
Let’s go over what you’ve just seen. onMutate is called every time the mutation is about to happen, so as soon as the user pressed the button to change the status of the exercise, queryClient.setQueryData updates the cached data and the local state of it.
Remember that TypeScript interface we defined earlier? We set isNotSynced to true, since exercise data has not yet been synced with the server. This ensures the app remains responsive, reflecting the user’s actions locally.
After the server responds successfully, we update the list again, but with isNotSynced set to false.
At this point, we can already view the list of exercises offline through the cache. However, we still cannot persist our mutations while offline so that they are sent when the device is connected again, so that's what we will implement in the next section.
Queueing User Actions when Offline
To implement this feature, we need to install four packages:
@react-native-async-storage/async-storage: a key-value storage system that is global to the app.@react-native-community/netinfo: React Native Network Info API for Android & iOS@tanstack/query-async-storage-persister: so we can create a React Query persistor using Async Storage.@tanstack/react-query-persist-client: set of utilities to queryClient interaction with the persistor.
After installing the packages, we can add this implementation on App.tsx:
import {onlineManager, QueryClient} from '@tanstack/react-query';
import NetInfo from '@react-native-community/netinfo';
import {createAsyncStoragePersister} from '@tanstack/query-async-storage-persister';
import {PersistQueryClientProvider} from '@tanstack/react-query-persist-client';
import AsyncStorage from '@react-native-async-storage/async-storage';

const queryClient = new QueryClient();

const persister = createAsyncStoragePersister({
  storage: AsyncStorage,
  throttleTime: 3000,
});

const App = () => {
  useEffect(() => {
    return NetInfo.addEventListener(state => {
      const status = !!state.isConnected;
      onlineManager.setOnline(status);
    });
  }, []);

  return (
    <PersistQueryClientProvider
      onSuccess={() =>
        queryClient
          .resumePausedMutations()
          .then(() => queryClient.invalidateQueries())
      }
      persistOptions={{persister}}
      client={queryClient}>
      <ExercisesPage />
    </PersistQueryClientProvider>
  );
};

export default App;
First we create a persister with createAsyncStoragePersister to store the query and mutations cache in Async Storage.
Next, we need to be sure that React Query is aware of changes in the device connection status, so whenever the network status changes, we are calling the React Query online.setOnline method.
Finally, we can wrap our whole application with PersisQueryClientProvider, and pass the persister and the query client as props, this way we can persist the query and mutation cache across app restarts, just like you would do with QueryClientProvider.
Result
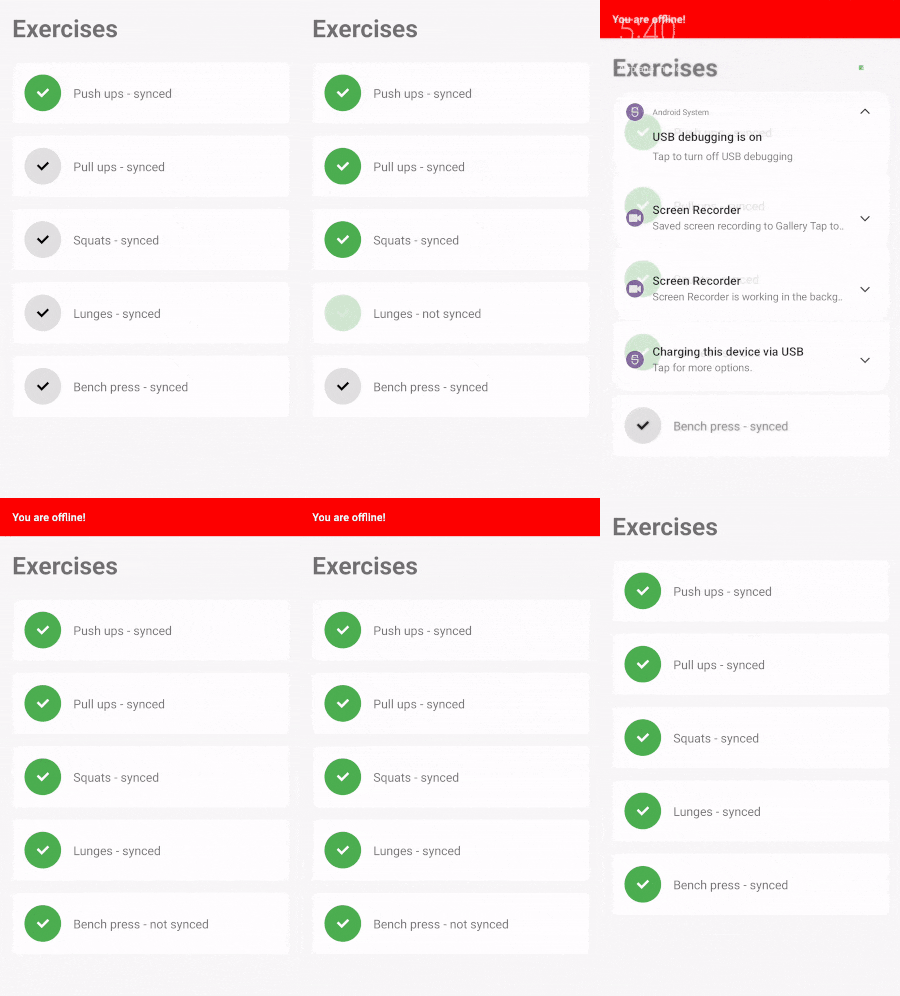
Here, we can see the complete working example where the app starts online, and the user can interact with the exercises in the list.
When offline, the user can continue to update the exercise status, but only locally. Finally, once the device has access to the internet again, the changes are synced with the backend.

Conclusion
Implementing offline-first functionality using React Query and TypeScript can provide a consistent and seamless user experience. It’s an excellent solution for designing offline-first applications in an easy-to-understand, type-safe, and flexible way. It offers valuable tools like query and mutation caching, automatic refetching, and data management.
Also, it’s important to note that offline-first features may not be suitable for all types of apps and can come with some limitations and conditions, like the amount of storage space used on the user's device, or the possibility of data loss if the user clears the app's cache.
If you are interested in the topic, there are several areas to delve into. For example, how to handle rollbacks, cache management, and how to use optimistic UI to improve your UX even more.
If you want to try the complete example, you can find it here on GitHub.
Thanks for reading, and see you in the next one!
